Stuck on something? Let me know and I'll add a hint (and/or an answer if you're really stumped).
Please note that this page was created for the original Playdate version of Ratcheteer. Most hints still apply to the full color Ratcheteer DX (available on Steam and Nintendo Switch) except for those that reference Playdate's buttons or unique crank.
Don't forget to crank! :)
There is information about the map in a notebook next to Wren in the center of Mechanic Town.
Hold B until the tool swapping menu appears. Use the D-pad to select Map then release B. Gray rooms haven't been visited yet. A flashing white flag represents the next story destination.
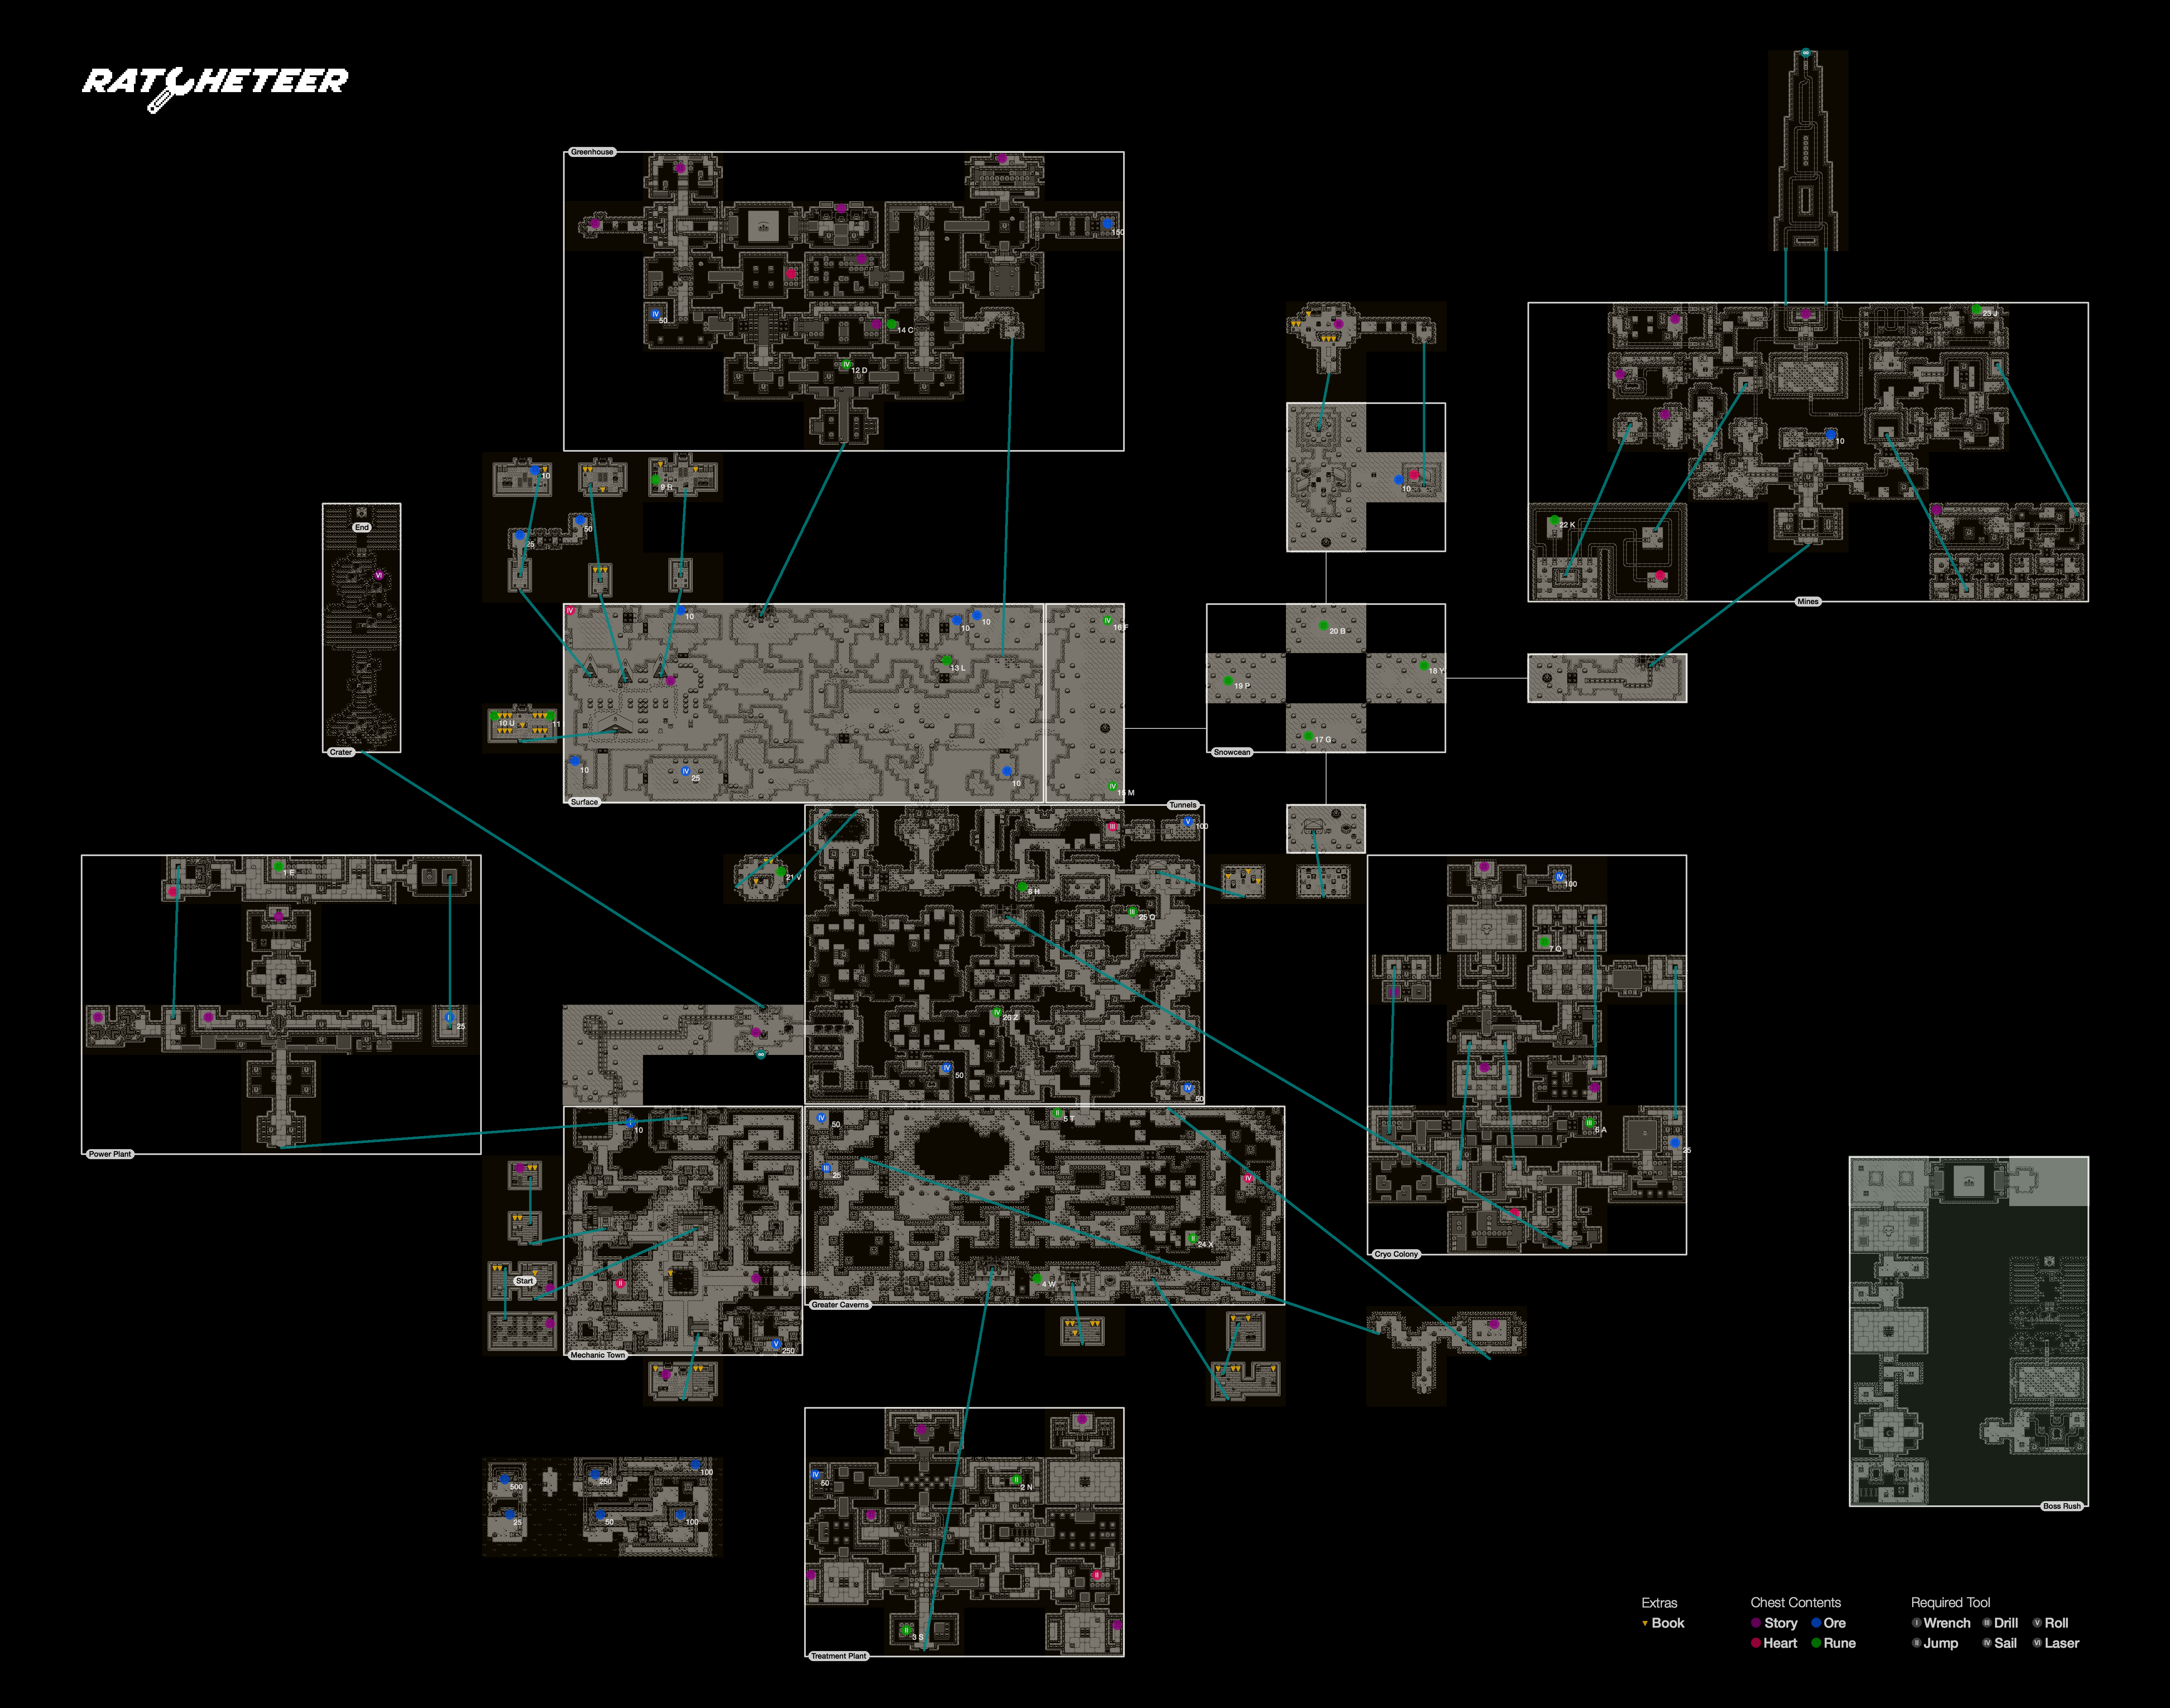
There sure is! Warning, this map is chock-full of spoilers (and slightly out of date). My body is ready.
If you were able to enter an area then you have all the tools you need to clear that area.
Along the way you may encounter optional paths or chests that you do not have the tools to access yet. Any obstacle along the story path can be cleared with your available tools or a new tool hidden somewhere within that area. Keep exploring (and don't forget to come back later for anything you can't reach the first time through)!
Bombs... Bombs!? That sounds extremely dangerous, especially living underground. One cave-in and it's all over. You will find no bombs in the world of Ratcheteer.
A skilled metalsmith can repair just about anything with enough ore.
Press A to turn the Crank Lantern on and off. Turn the crank to power it up.
Press A to slash the Wrench Sword. Turn the crank to give enemies and equipment a tune up.
The Hand Lens is a passive item that when equipped grants an improved awareness of your surroundings (in the form of on-screen icons indicating new dialog or uninspected points of interest in the current room). It also lets you read text that is otherwise too small to read.
See Where do I go next? above.
Go north from the bridge out of Mechanic Town (where you received the Power Plant Key from Chess, the exit is north-northwest). You will go through a room with slimes (slash through a stalagmite to the east, the exit is north-northeast), across a winding path over a pit (the exit is north-northwest), through a room with two bats (the exit is east), finally arriving at the Power Plant.
As a safety precaution, turnstiles will not turn while you are standing on them.
You really need to wind-up and swing. Put some elbow grease into it!
Make sure you're not standing on the turnstile and that the Wrench Sword is your active tool. Face the turnstile's nut and crank to spin-slash. That will rotate the turnstile 90 degrees clockwise. Continue cranking until the turnstile is in the desired position.
A good approach to any boss is to first figure out how to avoid its attacks, then focus on trying any newly acquired abilities until you discover a weakness you can exploit.
That just seems to be scaring it away. If only there was a way to draw it out of its hole...
Remember, nothing likes having a bright light shined directly in its eye(s).
Make sure the Crank Lantern is your active tool, crank it to full brightness and switch back to the Wrench Sword. Shine the light into the creature's eye while also dodging the spikes shot from its tail. Do not slash at the eye. It will grow increasingly agitated and eventually disappear only to leap out of another hole. When it does, first position yourself out of its path then slash at it before it descends into another hole. Repeat this sequence of actions two more times. You can do it!
Press A to jump. While airborne your other tool will swap in automatically and back out when you land.
The master mechanic responsible for the Power Plant had that key, so it stands to reason that the master mechanic of the Water Treatment Plant would have theirs.
The town outside the Water Treatment Plant appears to be abandonned but maybe its mechanics left a note.
A few steps south of the Community Center in the Abandonned Town is a single stalagmite concealing a path that snakes counter clockwise around the eastern ravine to a cave where the Water Treatment Plant's master mechanic and her people are hiding out.
A good approach to any boss is to first figure out how to avoid its attacks, then focus on trying any newly acquired abilities until you discover a weakness you can exploit.
That shockwave is intense but you can't feel the ground shake if you're not standing on it.
Those legs might seem like an easy target but they look pretty sturdy. You have to set your sights a little higher.
You don't have to! Certain backup tools, including the Wrench Sword, will automatically swap in when jumping and back out upon landing, all without having to press B. That means you can just press A to jump and then press A again in the air to slash.
Make sure the Jump Spring is your active tool and the Wrench Sword is your backup. There is a spotlight illuminating the center of the room so the Crank Lantern isn't necessary. Press A to jump just before a shockwave is about to hit you and it will pass safely beneath you. The timing might be easier with the vertical shockwaves so try to position yourself to the left or right of the boss instead of above or below it. When the boss is in the air keep an eye on its shadow to see where it will land. Try to move to the opposite side of the room so you have more time to react to the resulting shockwaves. After a few shockwaves it will stomp towards you. This is a good time to close the distance, jump (up, not forward) by pressing A, and then press A again to perform an air slash, right between its legs. It takes 6 hits and you have time to get in two (three if you're quick) air slashes between each of its assaults. If you're feeling confident, you can try air slashing while jumping over the shockwaves to chip away mid-assault. I believe in you!
Hold A to guard and deflect rushing water. Turn the crank to drill crumbling walls and enemies. In a pinch, it can also be used to turn a nut.
There are two ways to harness rushing water.
The water's momentum can allow you to clear distances impossible with an unassisted jump. Just step into the steam and then jump. Facing perpendicular to the jet will increase your jump distance a little but facing the same direction the jet is gushing can rocket you halfway across a room.
If you can find a way to deflect the water you can slowly advance on an oncoming jet or sidestep across a stream.
You can find a tool inside the Cryo Colony behind a locked door that will assist with crossing open water mains.
There is a staircase hiding in plain sight. You may need to take a leap of faith.
From the entrance go north then west. Drop down into the room with the two invulnerable patrollers and go north. Hop across the pits to the east. The stairs are on the left side of the next room, across a pit you can easily jump over.
A good approach to any boss is to first figure out how to avoid its attacks, then focus on trying any newly acquired abilities until you discover a weakness you can exploit.
Break it down. Only one of the attacks is actually targeting you. The other is just noise.
If you hug a wall you can turn a two dimensional problem into a one dimensional problem.
A shadow shows where the next rock will land. Don't be there when it does.
Sometimes the best offense is a good recently acquired defensive tool.
Before entering the boss room, make the Drill Shield your active tool and position yourself in the middle of the doorway. Once the battle begins rush the boss and crank to drill into it before its offensive begins. If you've lined yourself up well you might be able to stun lock it by advancing and drilling again before it can retaliate. The stun lock will be more difficult to maintain if you were slightly off center and it recoils to the left or right but if you can quickly realign yourself you might be able to keep it trapped.
If it breaks free it will begin to bounce around the room following a diagonal path, starting in your direction. If you're down and to the left try moving down and to the right (or vice versa) to avoid its initial charge. Whenever it hits a wall (but not a column) a large rock will fall from the sky. A shadow appears where that rock will land, usually right on top of you. When it lands it will explode into four smaller rocks that, like the boss itself, follow a diagonal path. Don't be there when it lands. Move in any cardinal direction (just not diagonally) that won't put you in the boss's path. When the boss finally slows, try to stun lock it again. Six drills will defeat it.
Maybe! You might have noted a similarity between the boss and the punchdrunk golems patrolling the Cryo Colony. You could think of the boss as the pugilist's parent and the more of its children you dispatch, the angier it gets. Two of the golems must be cleared to unlock the room they're in, but the one you encounter on the first floor is easily avoided. If spared, the boss will only require four drills to fell.
Press A while jumping to glide. Press again to drop like a rock and shake off any unwanted passengers or unstick stuck Shutter Steps. Turn the crank to steer on the Snowcean.
Like the Freezer mechanics, the Lifers on the surface have had to adapt technology to keep out unwanted pests. Their solution, Shutter Steps, were installed ages ago and as such have rusted shut, requiring a good jolt to open.
A good approach to any boss is to first figure out how to avoid its attacks, then focus on trying any newly acquired abilities until you discover a weakness you can exploit.
Squash it!
The boss itself is too light to trigger the spike pressure plate designed to keep pests out of the food stores. After stomping the boss it's best to glide to safety and regroup for a moment before your next assault.
Some unlikely allies can provide directions to points of interest. In your travels you might even stumble across a message in a bottle.
You sure can! (Many more people than I expected would did and seem to have enjoyed doing it.) There might even be some benefit to teasing it out yourself...
From the open Snowcean, sail east, north, west, north, east, north, east, and finally north.
From the open Snowcean, sail south, east, south, west, south, east, north, and finally east.
Sorry, you're on your own with this one. You'd do well to retrace your steps from the beginning...
You may find something of value the first time you go off course in any of the four cardinal directions.
Press A to take it on and off. Turn the crank to build speed then press any direction on the d-pad to dash.
Everything you need to release the lock is present in the room with the lock but it may not be accessible if you're already up on the rail.
X marks the spot. No, really!
Spoil sport. Use the Roll Armor to dash into the froghorn in each room that contains a rail lock.
A good approach to any boss is to first figure out how to avoid its attacks, then focus on trying any newly acquired abilities until you discover a weakness you can exploit.
There is a one of a kind enemy with a very specific weakness earlier in the Mines that behaves similarly to this boss. The same technique will advance the boss to its next phase.
You know what they say, "The way to a boss's heart is through a hole in the Mines wall." Perhaps in some dashing Roll Armor?
Their flight pattern is slow and predictable and centered on you. Don't you have a tool (perhaps recently acquired) you could train on them while they make their approach?
Tip: hold option/alt while clicking a hint to expand/collapse all of its nested hints too.